Search Manual
Band-in-a-Box® 2018 for Mac® User's Guide
Chapter 12: Tools, Wizards, Tutors, and Fun
Video Window
You can load videos that you have already downloaded from YouTube or elsewhere into Band-in-a-Box Video Window. This window is a great tool for learning and composing. For example, if you have a video music lesson that you want to learn but the riffs are too fast, you can slow down the video in Band-in-a-Box. The stretching quality is excellent, allowing you to decrease or increase the tempo by an incredible amount.
| |
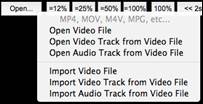
Press the Views - [Video] button and select Video Player from the menu to launch the Video Window and then click on the [Open] button on its toolbar. You will then see a menu of options. |
|
All the Import options allow you to add a video to your existing project, while the Open options will start a new project. You can choose to extract both the video and the audio of the file, just the video (no audio), or just the audio (no video). Many video formats are supported, including MP4, M4V, MOV, MPG, MPEG, and AVI. |
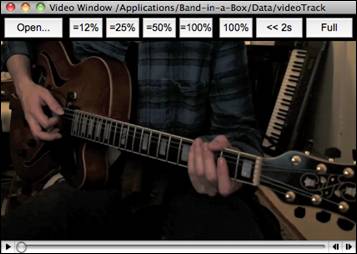
![]()
Use the transport control at the bottom of the window to play, stop, or move to a position in the video.
![]() As the song plays, you can slow down the video, and the audio will slow down and stay in sync. The quality of the audio at slower or faster tempos is great. The video slowdown range is 6-800%. This is a great tool for transposition. You can select a range in the Chord Sheet window and use Transport - [Loop] button to loop a section of the video at a lower tempo, for example.
As the song plays, you can slow down the video, and the audio will slow down and stay in sync. The quality of the audio at slower or faster tempos is great. The video slowdown range is 6-800%. This is a great tool for transposition. You can select a range in the Chord Sheet window and use Transport - [Loop] button to loop a section of the video at a lower tempo, for example.
![]() This button steps back 2 seconds.
This button steps back 2 seconds.
![]() There is a [Full] button to make the video full screen, and the Esc key will go out of the full screen mode.
There is a [Full] button to make the video full screen, and the Esc key will go out of the full screen mode.
DAW Plug-In Mode
There is a “plug-in” mode for your favorite sequencer (GarageBand, ProTools, Logic, Nuendo, Reaper and more). With the plug-in mode, Band-in-a-Box is open as a small window, and acts as a plug-in for your favorite DAW sequencer, so you can drag and drop MIDI and audio (AIFF, M4A) tracks from Band-in-a-Box to your favorite sequencer.
The DAW Plug-in mode is a mode within the regular Band-in-a-Box program. This mode allows you to transfer tracks or parts of tracks, to other DAW sequencers or Finder.
![]() You can enter and exit the plug-in mode easily by pressing the small [DAW] button on the main toolbar.
You can enter and exit the plug-in mode easily by pressing the small [DAW] button on the main toolbar.
When you do this, the window size of Band-in-a-Box becomes small. (You can resize it to the size/position that you want, and it will remember that).
Drag and Drop
|
This is the Drop Station where you drop a track after dragging it to get an audio or MIDI version of the track. There are 4 quadrants, and they are labeled according to the types of files that will be made by the drop: Audio Files (WAV, M4A, AIFF) or MIDI file (MID). |
|
When you drop the track onto the Drop Station, you will see an orange color, indicating that the track is accepted, and the file is being prepared. |
|
When the file is ready, the Drop Station turns green. You can now drag it to your favorite DAW or Finder. |
|
When you drop the track to the [+], you are presented with a dialog, where you can choose a file format and other render options. |
|
You can choose a format (WAV, AIF, M4A, or MID) of the file. When you have dragged the Master radio button, you can select the “Separate files for each track” option. If “Normalize audio files” is selected, the file will be normalized. Normalizing boosts the volume to a maximum level without distortion. Most professional music tracks are normalized. If you want to add ACID information (tempo, key, and time signature) to the WAV file, check the “Acidize WAV files” option. |
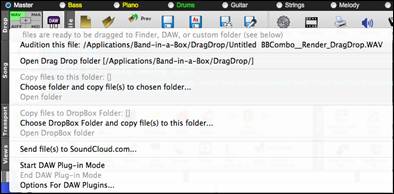
There is a right-click menu allowing you to copy the resulting file to a favorite folder, open the favorite folder, start/stop the DAW Plug-in mode, upload to SoundCloud.com and more.
Dragging Master Track
![]() If you want the entire performance, drag the Master button to the Drop Station. Then when it turns green, drag to a DAW or Finder.
If you want the entire performance, drag the Master button to the Drop Station. Then when it turns green, drag to a DAW or Finder.
![]() It will be dragged as audio, unless you have set it to be dragged as MIDI in Plugin Settings dialog.
It will be dragged as audio, unless you have set it to be dragged as MIDI in Plugin Settings dialog.
![]() By default, a single file is dropped, with the entire arrangement, but if you want all tracks transferred as separate files, you can enable this option in Plugin Settings dialog. (Note that your DAW will need to support dropping of multiple files and will typically put them on consecutive tracks.)
By default, a single file is dropped, with the entire arrangement, but if you want all tracks transferred as separate files, you can enable this option in Plugin Settings dialog. (Note that your DAW will need to support dropping of multiple files and will typically put them on consecutive tracks.)
Dragging a Single Track
![]() If you want a single track transferred, drag that track button to the drop station. (For example, drag the Bass button to transfer the bass track.) Then when the Drop Station turns green, drag that to a DAW or Finder.
If you want a single track transferred, drag that track button to the drop station. (For example, drag the Bass button to transfer the bass track.) Then when the Drop Station turns green, drag that to a DAW or Finder.
If the track is a RealTrack (green), then it will be transferred as Audio. If it is a MIDI track (yellow), then it will be transferred as MIDI.
![]() If you want MIDI tracks transferred as audio, you can set this in Plug-In Options dialog.
If you want MIDI tracks transferred as audio, you can set this in Plug-In Options dialog.
Dragging Selected Regions
![]()
If you would like to transfer only a portion of the performance, you can do this by selecting the region in Band-in-a-Box and then dragging the track button to the Drop Station (don’t drag the selected region). You will then get just the selected region dragged to a DAW or Finder.
SoundCloud and Dropbox Support
There is SoundCloud.com integration that lets you upload your compositions easily to the SoundCloud.com service. SoundCloud.com is a popular web service (unaffiliated with PG Music) that lets users upload their original songs for others to hear.
If you use the Dropbox service, you can easily drag/drop files from Band-in-a-Box directly to your Dropbox folder, or save audio to Dropbox, without leaving the main Band-in-a-Box screen. To do this, drag a track (or the Master button for all tracks) to the Drop station, and when it turns green, you can then right-click on the [Drop] button, and choose “Copy files to Dropbox Folder.”

Plug-In Options
|
To get to the DAW Plug-in options, press the [Plugin] button and choose the menu item “Options for DAW Plug-in” or go to the Preferences dialog and click the [DAW Plugin] button. |
You will then see the plug-in options.

Allow Drag and Drop (default=true) - If disabled, the Drag and Drop feature will not work. There shouldn’t be a reason to disable this.
Drag individual MIDI tracks as audio (default=false) - When enabled, the chosen MIDI tracks get converted to audio, using Apple® Synth.
Drag Combo (Master) track as audio (default=true) - When enabled, the entire arrangement gets converted to audio, using Apple® Synth. If not selected, the MIDI tracks in the arrangement get transferred as MIDI, in a single file.
Drag Combo as separate tracks (default=false) - If set to true, when dragging the Combo button, the drop will result in multiple files, one for each track.
Drag Audio as - You can choose the format of the audio files that will be created.
Show DragDrop Folder - This will show Finder where the dropped files reside. When you drag a file to your DAW, the file is created on disk and stored in the DragDrop folder inside the Band-in-a-Box folder.
Erase DragDrop Folder - This will erase (trash) all the dragged audio/MIDI files in the DragDrop folder. Note that some DAW sequencers require these files to reside permanently (or until you use a “consolidate” command in the DAW), so don’t erase these files unless you are sure that they are not needed.
“Woodshed” Tempo Feature
When practicing (or “woodshedding”) a tune, it is useful for the tempo to speed up every time the section loops or the song restarts from the beginning. To use this feature, press the [Practice] button on the toolbar, select the menu item Woodshed (increasing) tempo practice and set the “Woodshed tempo” value in the Tempo Woodshedding dialog.
![]()
For example, if you set the value to 5, the tempo will speed up by 5 each time the song (or a highlighted section) loops to the beginning. The idea is that you start off with a slow tempo, playing the part perfectly, and keep this up as the song tempo increases.

When you press Stop, the tempo reverts to the original tempo.
There are four modes to the woodshed tempo field.
- “Up only,” which is getting faster each loop “forever,” well until tempo = 500, which is BB’s maximum tempo.
- An “up then down” mode that goes up by [a settable increment] up to a [settable maximum] and then starts going down by the increment back to the original where it restarts. For example, a song with a tempo of 140, if you set the tempo to increase by 5, to a maximum increase of 100, the song will go from 140,145,150 etc. to 240, then go to 235,230… back to 140 and cycle again.
- An “Up then Reset” mode, that goes up in increments up to the settable maximum, then resets to the original and starts again. For example, a song with a tempo of 140, if you set the tempo to increase by 5, to a maximum increase of 100, the song will go from 140,145,150 etc. to 240, then go to 140 and start again.
- An “Up and stay at Max” mode that goes up until the maximum and stays there.
Modes 2 and 3 are analogous to a “treadmill workout,” with programmed changes in speed.
Playalong Wizard
The Playalong Wizard is an intelligent play along feature that uses your QWERTY keyboard to play along with Band-in-a-Box. This also allows you to record to the Melody or Soloist track without an external MIDI keyboard, and can even be used to trigger the Soloist Wizard. Also, play along using the Wizard can use the harmony feature, so you can play along live from your QWERTY keyboard in 4-part Saxophone harmony for example.
Turning the Wizard On/Off
Click on the [MIDI] toolbar button and check MIDI QWERTY Keyboard Wizard. You can also select the Wizard Playalong option from the Song menu, or press Option+W.
![]()
![]()
Playing the Wizard
The Wizard keys are only active during playback. The active keys are the lower 2 rows of the keyboard.
![]()
Changing Instruments / Settings for the Wizard
The Wizard is a play along instrument, so is treated just like the THRU instrument. Changing Instruments, Volume, Reverb, etc. for the Wizard is therefore the same as for the THRU instrument. (i.e., Click on the THRU button, then select instrument etc.) You can record the Wizard and it will use THRU harmonies if selected.
Play Regular Notes
There is an option to play regular “non-smart” notes, for those of you up to the task of poking out actual melodies on your QWERTY keys.
In the Song menu, toggle Wizard Uses ‘Smart’ Notes off (unchecked) to have the Wizard provide you access to a chromatic scale, and toggle on to have Band-in-a-Box provide you with notes based on the chord/key of the song.
Soloist Wizard
Additionally, you will find another great Wizard feature in the Soloist menu; the Solo Wizard. Toggling this option “on” enables the Soloist Wizard. As you play notes on the MIDI or QWERTY keyboard, the program will play “correct” notes in the style of the current Soloist! This means that you can play a perfect solo every time, simply by pressing any key on your MIDI keyboard or QWERTY keys.
Beyond impressing your friends with your newfound improvisational prowess, this feature has practical implications as well. For example, you can concentrate on practicing your solo phrasing and playing “in time” without concerning yourself with which notes to play (Band-in-a-Box will supply the correct notes: see the next section for details.)
Recording Using the Wizard
To record the Wizard, press the [Record MIDI] button to record, and play the Wizard. This will be recorded. You can use the feature of recording the Wizard to enter music without a MIDI keyboard that doesn’t sound as stiff as most music entered in step time. This is how it works:
- Press the [Record MIDI] button.
- As the song plays, play the melody that you want on any Wizard key, using the same key for each note, in the rhythm of the melody. The Wizard notes won’t be the exact melody, but don’t worry about that as you record.
- When you are finished, go to the Notation window. You now have the notes with the correct durations and times, but the wrong pitches.
- One by one drag the notes up to the correct melody note, holding down the shift, control, and
 key for sharps, flats, and naturals respectively. You will then have entered a melody that sounds like it was recorded from a keyboard, without the stiff sound of a melody entered in step time!
Scales Wizard
When students are practicing Jazz tunes, it is helpful to see the scales that are used for each chord. The Scale Wizard allows you to easily generate these scales, which appear as notation on the Soloist track. Options include Instrument Range, Patch Selection, Jazzy Mode (will use Lydian dominant scales for some 7th chords), and Diatonic Mode (keeps scales relative to the song key).
The Soloist | Scales menu items allow you to generate scales for a certain song, or auto-generate them for all loaded songs. View the scales in the notation or the on-screen guitar and piano.

Scale Direction - When playing a new scale, either start on the root of the scale (going up) or start with the closest scale tone (moving up or down). The two modes are:
1. Ascending. The scales will always start on the root that is in the octave above the Lowest Note that is set and will play in ascending order.
2. Walking. The scales will start on the nearest scale tone to the previous tone that was played. The notes will ascend to the Highest Note setting, and then descend (by scale tones) down to the Lowest Note.
Write to Track - Choose Melody or Soloist track to write the scales to.
Lowest Note is the lowest note to play for any scale. C5 (note 60) is middle C.
Highest Note is the highest note to play, used when the scale direction is up and down (Walking).
Scale Tones Diatonic to Key Signature - If diatonic, minor scales will be according to the key (VI minor is Aeolian etc.). Otherwise, all minors will be Dorian.
Use Jazz Scales - If set, will use Lydian b7 chords. Chords like Bb7 in the key of C will have Lydian b7 scales (i.e. A#4 in the scale).
Patch - Send this MIDI patch (instrument) when playing the scale.
[Defaults] sets to default values.
[OK- Generate Scales] writes the scales to the notation of the selected track, Soloist or Melody.
Audio Chord Wizard (Stand-alone)
This amazing wizard automatically figures out the chords from any MP4, M4A, AIFF or other audio file and displays them in Band-in-a-Box. Just load an audio file to instantly see the chords.
|
Launch the Audio Chord Wizard with the toolbar button or with the Windows | AudioChordWizard | Run AudioChordWizard menu command. |
Audio Chord Wizard Window
The Audio Chord Wizard window shows an overview of the open wave file with the bar lines and chords as interpreted by the wizard below. Controls and settings are found in the toolbar at the top of the window, and the lower part of the window either shows chords and bars in a Chord Sheet view or notes in a Note Bars view.

Primary Program Controls

|
Toggle Play/Pause (Space bar or multimedia Play/Pause key). |
|
Stop play, rewind to start with Esc key or multimedia Stop key. Press the letter W to rewind without Stop. |
|
Set the Bar One location. The Audio Chord Wizard works best if you do this first, before any other actions. This moves nearest bar line to the current play position. The Tab key also sets bar lines. |
|
Moves nearest bar line to current play position. Tab or F8 keys also set bar lines. |
|
Exit and send chords to Band-in-a-Box. |
|
Average tempo, control+click the tempo box for options. |
|
Song time signature, 2/4 to 12/8 supported. |
|
Song key signature. |
|
Use to correct pitch of song if necessary to improve chord recognition. |
|
Select either the Chord Sheet view to follow along with the chords of the song, or the Note Bars view to see the notes interpreted by the Audio Chord Wizard in a piano-roll type of display. |
|
The zoom buttons at the bottom of the screen adjust the scale of the display. The minus button shrinks the display to show more bars, the plus sign expands the display but shows fewer bars. |
Keyboard Shortcuts
Keyboard shortcuts make it easier to navigate the song and tap in bar lines without having to work the mouse with start/stop/scroll actions.
Play/Pause - Space Bar.
Stop - Esc.
Tap Barline - Tab key.
Jump To Song Start - W key.
Jump Forward One Bar - right arrow key.
Jump Back One Bar - left arrow key.
Jump Forward Four Bars - down arrow key.
Jump Back Four Bars - up arrow key.
Chord Sheet Overview
The Chord Sheet window in the Audio Chord Wizard shows the chords for the whole song on a single screen. This allows you to click on a bar on the Chord Sheet to jump to that area of the song.
You can mark sections of the song using part markers, and the sections will begin on a new line with a line space between so they are clearly seen. So, you can then also learn the form of the song, as you can see the various sections (intro/verse/chorus/break) at a glance, or quickly jump to the any section simply by double-clicking on that part of the Chord Sheet.
For this discussion, open /Band-in-a-Box/Tutorials/Frontier.m4a.
You will now see the song, and the Chord Sheet window in the Audio Chord Wizard is visible.
![]() Play the song.
Play the song.
|
Locate the start of bar 1 on the waveform and click on the [Set Bar One] button. You may have to stop the song and start over again to pinpoint the location, but once you do the Audio Chord Wizard can accurately mark the rest of the bar lines. |
|
You can insert your own bar lines by clicking on this button or by pressing the Tab key. When a new bar starts, hit the [Tap Barline] button (or Tab key). This is called “tapping in a bar line.” |
Bar lines can be tapped in as the song is playing or when it is stopped. You will see that if you tap a bar line near to an existing bar line the existing line will be moved to the location of your tap.
The first time you do that, the program will consider that point to be “bar 1.” Tap in a few more bar lines.
Click on the Chord Sheet, and the music will jump to that location.
Now, let’s define some sections in the song.
If a bar begins a new section, click on the bar # on the Chord Sheet, or press the P key to put in a part marker. Pressing P again will change the part marker, and then turn it off.
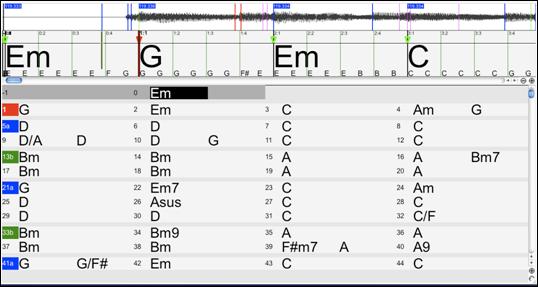
Now the song is divided into sections, with space between each section, and each section starting on a new line.
|
To change the # of bars per row, or rows per screen, right-click or control+click on the Chord Sheet. |
|
The +/- buttons at the bottom right of the window also change the row height. |
Chords may be edited in the Audio Chord Wizard with a right mouse click or control+click on the chord. When Edit Chord is selected, a highlight cell opens at the chord location. Type in the name of the new chord using standard Band-in-a-Box chord entry characters and press the Enter key to make the edit. The edited chord name is colored blue.
![]()
Individual edits can be removed with the Remove Chord Edit command, or all edits in the song can be removed with the Remove All Chord Edits command. Part markers, chord symbols, key signature, and tuning setting are saved in Band-in-a-Box, and are passed back and forth to the Chord Wizard.
The Audio Chord Wizard is a great way to learn the chords of songs. You can add section markers and divide the song logically into sections, so it is also a great way to learn the “form” of the song, an essential part of learning popular songs.
As well as the chords of the song, the Audio Chord Wizard also figures out,
- the tempo of the file,
- bar lines throughout the song,
- fine tuning detection (e.g. 5 cents sharp from A440).
Note Bars
The Note Bars display is an alternative to the Chord Sheet window. It shows many of the notes found in the file. This serves as a helpful guide to transcription and can also help to verify chord names.
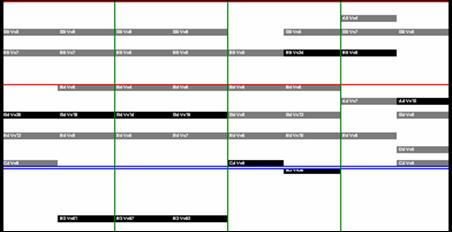
The Audio Piano Roll is divided by a blue horizontal line. Notes below the blue line have been identified as the bass part by the Audio Chord Wizard.
The note bars look like a MIDI Piano Roll, but they are not exactly the same as a MIDI Piano Roll. Audio Chord wizard detects the strongest frequencies found in each eighth-note time slot and displays them in the Note Bars window.
Sometimes the displayed frequencies REALLY ARE instrument notes played in the audio file. But they could be spurious information, such as the accidental loudest frequency of a drum beat. A midrange frequency note-bar might be showing the sum of harmonics from several instruments, each instrument’s harmonics contributing to the strength of that frequency.
The Notes Bars display information is real and useful but try not to assume that every displayed note-bar is a real note in the audio.
Opening Files
|
When the Audio Chord Wizard button is pressed, the program window will open and then launch the Open Wave File dialog for selection of the audio file to be analyzed. There is a file named Frontier.m4a in the /Band-in-a-Box/Tutorials folder that you can use to try out the Audio Chord Wizard. |

When you select a file to open you will see a series of progress messages. The Audio Chord Wizard is then launched, and more progress messages will flash on screen as the file is analyzed and imported. As well as interpreting the chords, the program is also inserting bar lines and setting the tempo.
Chord Detection
Chord Detection accuracy depends on the accuracy of the bar lines. If bar lines are not well-aligned, then the Chord Detection can be expected to be rather poor. It is quick and easy to align the bar lines on most songs, once you get the hang of it.
The first task is to locate the beginning of Bar One. Since an audio file could have an arbitrary amount of silence at the beginning of the song, and many songs begin with a pickup partial bar, ACW cannot easily guess the first bar without a hint from you.
The shortcut keys and mouse playback controls make it easy to find Bar One. Tap the space bar to begin play, watch the Location Cursor, and listen for the downbeat. If the Location Cursor passes the downbeat and you were not completely certain of the location, you can tap the W key to rewind to the song beginning and replay the first part of the song, to audition the downbeat as many times as necessary to make sure of its location.
You can also single-click in the Chords panel to jump the playback position. If the rhythm is unusually complicated near the downbeat, you could repeatedly click just a little before the suspected Bar One location, to zero-in on the exact downbeat.
In the following example song, we have discovered the downbeat of Bar One, so we control+click on that location to Set Bar One.
|
Now the Bar One bar line is red (shown below). The red Triangle bar indicator indicates that we have edited that bar line. The Red Triangles are called Good Bar Lines (GBL’s). The green Triangle bar indicators are bar lines which ACW has automatically inferred from its automatic tempo detection PLUS your edited Good Bar Lines. We call the green automatic bar lines Inferred Bar Lines (IBL’s). On this example song, the initial automatic tempo detection did a pretty good job. Simply setting Bar One has caused the first four bars to be properly aligned to the music. On some songs, Set Bar One is the only action necessary to get good bar alignment for the ENTIRE tune. |

Approaching Bar 5, the automatic tempo tracking begins to drift. The current position of the Location cursor is where Bar 5 SHOULD be. That is easy to fix.

If you prefer real-time control, just tap Tab or the F8 key where the downbeat should actually be.
If you prefer stopped-time editing, you can either mouse-drag Bar 5 to its desired position or drag the playback Location cursor to the desired position and then tap Tab or the F8 key.
When we tap the Tab key, or alternatively click on the [Tap Barline] button, the Audio Chord Wizard will automatically recalculate the bars to the right of the playback position as playback continues.
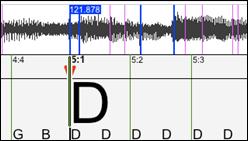
Now the Good Bar Line is drawn red to show that it was edited. The chords are now much better.
In the case of this song, setting this one bar line is sufficient to get good tracking to the end. Songs which have drastic tempo changes, loose feel, or time signature changes could require a few more adjustments.
When satisfied with the bar lines and chords, click the [OK – Send to BIAB] button to return the chords and tempo map to Band-in-a-Box.
Special Cases
Time Signature
If a song is not in the default 4/4 time signature, set the Time Signature very early before you do anything else.
Bad Initial Tempo Estimates
Double/Half Tempo
Sometimes Audio Chord Wizard will guess double or half of the tempo you might prefer.
Slightly Wrong:
Sometimes syncopated songs can have musical anticipations which make ACW guess a tempo slightly too fast or slightly too slow.
Completely, Horribly Wrong
Some songs have rhythms difficult for a computer to understand. Sometimes a song’s rhythmic beats are spaced in such a way that a song with a perfect Tempo of 120, might mathematically BETTER fit the audio beats at some simple (but wrong) related ratio such as 80, 100, 160, or 180 BPM.
If the initial Tempo Estimate is pretty good, the Tap Bar line function will be the easiest way to fix such errors, requiring only a few keyboard taps during playback.
But if the initial tempo estimate happens to be horribly wrong, it helps to make the initial tempo “in the ballpark” BEFORE you tap a few Tabs or F8’s to make it completely right.
Control+click on the Average Tempo control for some easy automatic fixes.

Note: If you want to use the Avg Tempo Menu functions, use the menu very soon after you have opened a song, before you have done much bar editing. If you invoke the Avg Tempo Menu functions after you have laboriously edited a lot of bar lines, the automatic nature of these functions can ruin your previous editing.
In some cases, there is a good reason to initially set the tempo artificially slow by using the “Find Best Half Tempo” function.
For example, if the initial tempo estimate is considerably faster than the tempo that you want to tap in, the Tap Bar line function can mistakenly think that you want a very fast tempo, which fills the remainder of the song with unwanted fast-tempo bars. In that case, if you initially set the tempo very slow, ACW will be unlikely to misinterpret your Tap Bar Lines.
Set Key Signature
Once the chords look reasonable, for instance if your song looks like it is probably in the key of F, set the Key Signature control to F for better chord spelling. This only affects the cosmetic display of notes and chords (flats and sharps). The Key Signature control does not currently affect the basic accuracy of Chord Detection.
Adjust Fine-Tuning
If a song is significantly off from concert pitch, the notes are “in the cracks,” which makes chord detection less accurate.
If your chords look reasonable, there is no need to bother with fine tuning. Most songs are recorded pretty close to concert pitch.
But if you see numerous chord errors, it may help to adjust the Fine Tune control.
If you are playing along with a song on your keyboard, you might decide to make an ear-estimate of how far out-of-tune is the song:
For instance, you could adjust the fine-tuning control on your keyboard until your keyboard matches the song’s pitch (according to your ear). Then you could look at your keyboard’s tuning readout and adjust ACW’s Fine Tune control to match. Either click-drag ACW’s Fine Tune control (like a slider control), or control+click the Fine Tune control then type in a number.
The Fine Tune control currently does not change the pitch of playback, it only improves chord detection on mis-tuned songs.
The Fine Tune control is calibrated in cents, 1/100th of a semitone. Therefore, if a song is perfectly in the key of C, but if you set Fine Tune to +100 Cents, ACW would display chords in the key of B. Similarly, if you set Fine Tune to -100 Cents, it would display that song’s chords in the key of C#.
That simple use of the Fine Tune control is just a backwards way to transpose the chords. But if you set Fine-Tune somewhere in the middle, ACW looks for notes that are somewhere “in the cracks” between the piano keys. For instance, if your song SHOULD be in the key of C, but it was unfortunately recorded 50 cents sharp.
There could be many reasons that a song was recorded off concert pitch. Maybe the recording studio had a broken tape recorder, or the singer couldn’t quite hit the highest note. Perhaps the vinyl record cutter was off-speed, or some record executive decided that the song was 10 seconds too long for airplay and instructed the mastering engineer to speed it up a little bit. In such cases, the Audio Chord Wizard can get confused, mis-identifying some pitches too high and other pitches too low, detecting nonsense chords.
So, if your favorite song was unfortunately recorded 50 cents sharp, you can set the Fine Tune control to +50 cents so that ACW will properly display in the “original” key.
Auto Estimate Tuning
ACW can automatically estimate the tuning, which helps in some cases. Since the estimation is math-intensive, ACW only analyzes one bar of music at a time. Control+click somewhere inside a bar and pick the Estimate Tuning function. After the process is finished, up pops the results dialog. As advised in the dialog, results can be improved by carefully picking the bar. Bars with relatively long notes are easier to analyze, compared to bars containing flashy fast melodies. |
|

It can be useful to spot-check a few bars. If several spot-checks give similar answers (within a few cents), you have good confidence that the results are actually meaningful, not being randomly affected by out-of-tune melodies or loud drums.
However, if the first estimate reads +43 and the next measurement reads -12, then it probably means that your song is not a good candidate for automatic Tuning Estimation.
Odd Length Bars and Drastic Tempo Changes
If a 4/4 song contains occasional bars of 3/4, 5/4, or whatever, or if there are sections where the music has an extreme retard or accelerando, sometimes you can just Tap Bar Lines to adjust it.
But it is sometimes more convenient to manually add or delete bar lines. The following example song has an overall Time Signature of 4/4, but Bar 9 should have a time signature of 2/4. If you simply Tap Bar Line on 9:3 to shorten the bar, then ACW will mistakenly decide that you wish to make all the following bar lines double-tempo 4/4.
Solution
First, control+click on the beat 9:3, and Insert a bar line.
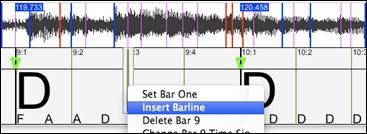
Now a new bar line is added, and three new GBL bar lines are flagged red.

Control+click on the new shortened Bar 9 and set the Time Signature to 2/4. 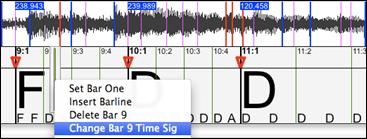
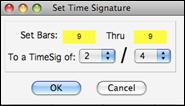
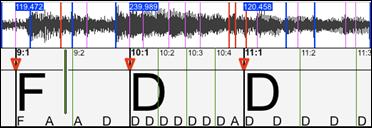
Change Bar 10 to its desired duration. Hover the mouse over the red triangle marker at Bar 11, and the mouse cursor becomes a drag cursor. Click and drag the bar line to the location marked 11:3.

Now we have edited bar 9 to have a 2/4 Time Signature and preserved the song tempo on both sides of the 2/4 bar.
Note Bars Display
The Note Bars display looks like a MIDI Piano Roll, but it is not exactly the same as a MIDI Piano Roll. Audio Chord wizard detects the strongest frequencies found in each eighth-note time slot and displays them in the Notes Display.
Sometimes the displayed frequencies REALLY ARE instrument notes played in the audio file. But they could be spurious information, such as the accidental loudest frequency of a drum beat. A midrange frequency note-bar might be showing the sum of harmonics from several instruments, each instrument’s harmonics contributing to the strength of that frequency.
The Notes Display information is real and useful but try not to assume that every displayed note-bar is a real note in the audio.

Display Controls
Horizontal Scroll Bar
![]()
Scroll forward/back in the wave file.
Plus/Minus Zoom Buttons
![]() Zoom the display to show more or less detail.
Zoom the display to show more or less detail.
Audio Chord Wizard Utilities Dialog
When you press the [OK - send to BIAB] in the Audio Chord Wizard and return to Band-in-a-Box, a utilities dialog opens. This dialog can be opened any time from the menu Audio | Audio Chord Wizard Utilities.
|
The dialog lets you set the song key to the key of the audio file that the wizard has detected, make a tempo map in Band-in-a-Box, or erase the audio from the Audio track. If you check the Enable Style option, you will hear the imported audio as well as the tracks generated by the current style. If you want to hear just the audio, uncheck this option. |
The wizard analyzes a key signature based on the chords in the audio file. If you agree with the analysis, press the [Set the song key signature to …] button.
When an audio file is loaded into the Audio Chord Wizard, there will be bar lines assigned automatically by ACW, and perhaps modified by you. If you want the current song to follow these bar lines so that it will play in sync with the audio file, press the [Make a tempo map in BB] button. You will then see red boxes on the Chord Sheet, indicating tempo changes and the presence of a tempo map.
![]()
Press [Erase Tempo Map] to remove the Tempo map, and the red boxes will disappear around the bar lines.
The [Erase the Audio WAV file in BB] button erases the Audio track.
Audio Chord Wizard (Built-in)
The built-in Audio Chord Wizard can be accessed from the Audio Edit window.
First, import an audio file with the Audio menu item.
![]()
![]()
Next, select Audio Chord Wizard (Audio Edit) from the Audio menu. This will open the Audio Edit window with the Audio Chord Window marker mode selected.
![]()
![]()
Alternatively, you can press the [Audio Edit] button, and when the Audio Edit window opens, press the [Marker Mode] button on its toolbar and select Audio Chord Wizard from the menu.
|
|

The first task is to locate bar lines in the audio so that the Audio Chord Wizard can detect chords accurately and the audio will play in sync with the Band-in-a-Box song.
![]() You can add bar lines with the [Add Bar Line] button or with the L key on your keyboard. A bar line will be placed at the audio edit cursor or at the playback cursor if the song is currently playing.
You can add bar lines with the [Add Bar Line] button or with the L key on your keyboard. A bar line will be placed at the audio edit cursor or at the playback cursor if the song is currently playing.
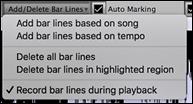
![]() The [Add/Delete Bar Lines] button menu has options to add bar lines based on your song structure or tempo. You can delete all the existing bar lines or only the ones within the highlighted region.
The [Add/Delete Bar Lines] button menu has options to add bar lines based on your song structure or tempo. You can delete all the existing bar lines or only the ones within the highlighted region.
![]() If “Auto Marking” is enabled, then Band-in-a-Box will automatically add and arrange bar lines based on the bar lines you have added manually. The “auto” bar lines will show in light blue, and the “user” bar lines will show in purple. You can change these colors in the Audio Edit Settings dialog if you want.
If “Auto Marking” is enabled, then Band-in-a-Box will automatically add and arrange bar lines based on the bar lines you have added manually. The “auto” bar lines will show in light blue, and the “user” bar lines will show in purple. You can change these colors in the Audio Edit Settings dialog if you want.

![]() If “Auto Analysis” is enabled, then Band-in-a-Box will re-analyze the chords in the audio whenever you add or move a bar line, or when you edit the audio data. Keep this setting disabled if you prefer to set all bar lines first (i.e. establishing tempo), and then analyze the chords when you are done.
If “Auto Analysis” is enabled, then Band-in-a-Box will re-analyze the chords in the audio whenever you add or move a bar line, or when you edit the audio data. Keep this setting disabled if you prefer to set all bar lines first (i.e. establishing tempo), and then analyze the chords when you are done.
Bar lines can be moved with the mouse. Just click and drag the thumb control at the bottom. If you move an “auto” bar line, it will become a “user” bar line.
|
You can also right-click on the thumb control to get a context menu with options to switch a marker type (“user” or “auto”), delete the bar line, or set the time signature for the bar. The menu also shows you the tempo of the bar, based on the time signature of the bar and the position of the next bar line. |
When you add or move bar lines, Band-in-a-Box will automatically make a tempo map, so your song is in sync with the Audio track.
Any changes you make in the Audio Chord Wizard mode are undo-able. This was previously not possible with the standalone Audio Chord Wizard.
![]() Use the [Analyze] button to analyze the chords in the audio. The chords detected in the audio will be written into the Chord Sheet. You don’t need to do this if you have “Auto Analysis” enabled, but you might want to if you have erased or made changes to the chords in the Chord Sheet.
Use the [Analyze] button to analyze the chords in the audio. The chords detected in the audio will be written into the Chord Sheet. You don’t need to do this if you have “Auto Analysis” enabled, but you might want to if you have erased or made changes to the chords in the Chord Sheet.
When you open the Chord Sheet, you will see the Audio Chord Wizard has entered the chords and the tempo map.

MIDI File Chord Interpretation Wizard
Many people who play music by ear think of songs in terms of “Chords and Melody.” However, many MIDI files lack chord symbols, so they become difficult to learn without the user having to figure out the chords in a time-consuming process.
Now you can open any MIDI file in Band-in-a-Box, and Band-in-a-Box will automatically figure out the chords of the song for you. It automatically analyzes the MIDI file, figures out where the Bass, Piano, Melody, and other tracks are, and then figures out the chord changes for the song. The chords are written onto the Chord Sheet like any other song. This allows you to quickly learn how to play a song from a MIDI file - just read it into Band-in-a-Box and you’ll see the chord symbols, and then learn the melody! You can also read tracks into the Melody and Soloist tracks.
To interpret MIDI chords, first blank the Chord Sheet, by choosing File | New. Then select the menu item File | Import | Import Chords from MIDI File or press the keystrokes control+option+I. This launches the Chord Wizard dialog.

![]() Press the [Open (Change)…] button to select the MIDI file that you’d like to import. If you select the “All” checkbox, then all files will be displayed. If you deselect the “All” checkbox, then only filenames ending with .MID will be displayed.
Press the [Open (Change)…] button to select the MIDI file that you’d like to import. If you select the “All” checkbox, then all files will be displayed. If you deselect the “All” checkbox, then only filenames ending with .MID will be displayed.
Note: Any Band-in-a-Box song can quickly be converted into a MIDI file by pressing the [.MID] button, or with the keystrokes Option+S, or from the menu File | Save Special | Save Song as MIDI File. The song will be saved in the Band-in-a-Box folder with the same file name, but the file type will be “.MID.” For example, the Band-in-a-Box song Violet.MGU becomes the MIDI file Violet.MID.
![]() Once you have selected the file, you can press the [INTERPRET CHORDS NOW] button. When you do that, the chords will be interpreted from the MIDI file, and written onto the Chord Sheet.
Once you have selected the file, you can press the [INTERPRET CHORDS NOW] button. When you do that, the chords will be interpreted from the MIDI file, and written onto the Chord Sheet.
Prior to pressing the button, you might want to make some custom settings.
![]() When you load in the MIDI file, Band-in-a-Box automatically interprets many things from the MIDI file for you. Normally you’d want this to happen, but if for some reason you’d prefer to make the settings yourself, you can set “Auto Interpret settings from MIDI file” to false.
When you load in the MIDI file, Band-in-a-Box automatically interprets many things from the MIDI file for you. Normally you’d want this to happen, but if for some reason you’d prefer to make the settings yourself, you can set “Auto Interpret settings from MIDI file” to false.
The settings that are determined automatically for you are:
- The key signature of the song (MIDI file). Some MIDI files contain a special event that states the key signature of the file, but most don’t. For the ones that don’t, Band-in-a-Box analyzes the tracks and makes a “best guess” at the correct key signature for the song. It usually gets it right, but if it’s wrong, it’s likely out by a 4th or 5th interval.
- Tempo, time signature.
- The channels used for the Bass part, Piano (comping) parts.
- The channels used for the Melody parts.
- The number of bars in the song to import, including the number of lead-in bars in the song.
Once you have loaded in the MIDI file, (by pressing the [Open (Change)…] button), and assuming that you have the “Auto Interpret” set to true, you’ll see that the dialog displays the settings that the Chord Wizard has found in the MIDI file for the key signature and channels used for the song.
Let’s work with an example song called Violet Song.MID.
This should be included in your Songs folder. For this example, we are going to interpret the chords of this MIDI file and read them into Band-in-a-Box.
Start with a blank Chord Sheet by choosing File | New.
Choose the MIDI file Chord Wizard dialog by choosing File | Import Chords from MIDI File.
![]() Press the [Open (Change)…] button to select the MIDI file, and then choose the file that you would like to import. In this case, it is called “Violet Song.MID.”
Press the [Open (Change)…] button to select the MIDI file, and then choose the file that you would like to import. In this case, it is called “Violet Song.MID.”
Once you load in the file, you will notice that the Chord Wizard has analyzed the MIDI file and made these determinations for you.
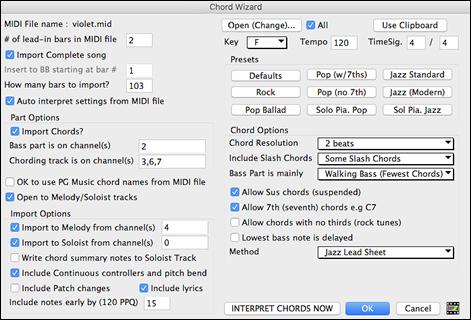
It has automatically determined that the “Violet Song.MID” file
 has 2 bars of lead-in,
 has 103 bars of chords,
 is in the key of F with a 4/4 time signature, and a tempo of 120.
 The Bass part is found on channel 2.
 The chording (comping) parts are found on Channels 3, 6 and 7.
 The Melody is found on Channel 4.
There are no other parts like the Melody that should be put on the Soloist track.
Presets for Chord Options
Now, after loading in the MIDI files, you’d normally have a look at these settings to see if they seem reasonable for your MIDI file. If they are not, you can change the settings. For example, if you know that they key signature of the song is not F but is C, then you would set that. Similarly, if you knew that the Melody channel was on channel 3, you could set that to override the Chord Wizard settings.
Presets
Once you have done that, choose one of the Presets to quickly enter the settings to the type of song that you are trying to interpret. Preset choices are Jazz Standard, Jazz (Modern), Pop (with seventh chords), Pop (with no seventh chords), Rock, Pop Ballad, Solo Piano, and Solo Piano (Jazz).

Chord Options
When you choose one of these presets, it automatically makes a number of settings in the Chord Options section of the dialog, but you can override them in this dialog. These include,
![]() (Range from 1 beat to 4 bars, default = 2 beats)
(Range from 1 beat to 4 bars, default = 2 beats)
This is the minimum number of beats for a chord. For example, if you set it to 2 beats, then the Chord Wizard will never attempt to come up with different chords that are only a beat apart.
![]()
If set, the Chord Wizard will include “slash chords” like F7/A or Cm/G.
![]()
You can set this to “Root only,” “Root third and 5th,” or “Walking bass.” If you choose “Root Only,” the Chord Wizard will assume that any bass note is the root of the chord. Choosing “Root-3-5” will cause the Chord Wizard to assume that the bass pattern is mainly on the root-3-5 of the chord. If you choose “Walking bass,” it will assume that the bass notes can be changing and can include many notes beside the root. Setting the “Walking bass” line will likely result in fewer chords overall than setting the “Root only” option.
|
The setting for “Allow Sus” chords determines if chords like Csus or Bbsus7 will be included. The “Allow 7th chords” specifies if 7th chords like C7 or Bbm7 would be allowed. |
Simple Rock songs might not have 7th chords or SUS chords. Allowing chords with no thirds should be set in a hard rock song, or similar song with “power chords” that might not contain the 3rd of the chords.
![]()
Usually a bass player plays the root of the chord at or near the time when the chord changes. But in solo piano playing or some bass styles, the bass doesn’t state the root until later on, and this setting should be set to “delayed” in a solo piano style of this type.
![]()
You can also set the primary style of the song to Jazz or Pop using the Lead sheet Method combo box.
Using the Chord Options Presets to make settings for Violet Song.MID.
![]() For the song “Violet Song.MID,” we know that this is a Jazz Swing type of song, so we press the preset called “Jazz Standard.”
For the song “Violet Song.MID,” we know that this is a Jazz Swing type of song, so we press the preset called “Jazz Standard.”
By doing this, we see that the chord options have then been set to Chord Resolution of 2 beats, no slash chords, walking bass, sus chords, 7th chords, and Jazz lead sheet.
These settings look OK for our Jazz song; if we wanted to customize it (for example to allow slash chords) we could do it at this point.
So, to recap, using the Chord Wizard is a 3-step process.
 We loaded in the song “Violet Song.MID.”
  Pressing the preset button called “Jazz Standard,” we then looked at the Chord Options settings for the various channels and they looked OK, so we didn’t make any changes.
 We then press the [INTERPRET CHORDS NOW] button – this gets the Chord Wizard to interpret the chords and write them to the Chord Sheet.
Once we’ve pressed the [INTERPRET CHORDS NOW] button, we can see the results by looking at the Chord Sheet. Here are the chords that were interpreted,

Chord Wizard results – interpreting from “Violet Song.MID.”
So that we can see how well the Chord Wizard did, we can compare it to the “correct chords” of the song, input by a musician listening to the song. You can see these by loading in the song “Violet Song.MGU.”
 The “correct chords” for the song “Violet Song.MID.”
As you can see, by comparing the two sets of chords, the Chord Wizard got almost all the chords correct in this example. The Chord Wizard purposely avoids chords like “C13,” it will put a simpler “C7” instead, since this is more like a typical lead sheet.
If you have read in the entire MIDI file, you have 103 bars of chords on the Chord Sheet. This actually contains 3 choruses of the song. You might want to reduce that to a single chorus, by setting the chorus end of the song to bar 36, and then erasing the excess bars (after bar 36) by choosing Edit | Erase.
Examining the song that has been interpreted by the Chord Wizard.
You will notice that the title (Violet Song), key (F,) and tempo (120) have been set to the values found in the file. Part markers are not set; the Chord Wizard doesn’t try to guess where part markers might be occurring. You need to put the part markers in yourself. You also need to choose the style to use (a Jazz Swing style in this case).
If you examine the Melody track by opening the Editable Notation window and option clicking on some notes you will notice that the Melody track contains notes from Channel 4, which is what we specified in the Chord Wizard dialog.
Importing part of a MIDI file or redoing a section of the Chord Sheet.

Normally we’d want to import an entire MIDI file worth of chords. But if you only want to import some bars, you can deselect the “Import Complete Song” checkbox, and then specify where to start in the MIDI file (i.e. “the # of lead-in bars in MIDI file”) and what bar to start at in Band-in-a-Box (“Insert to BB starting at bar #”) and the # of bars to import (“How many bars to import”).
For example, using the song “Violet Song.MID,” we could redo a section of the song using different settings (for example, a chord resolution of 1 beat instead of 2 beats). If we were unhappy with the results at bar 7 and 8, we could redo this by making the settings as follows:

Other Settings for the Chord Wizard
![]()
Band-in-a-Box and PowerTracks Pro songs contain special events that write the exact chord names into the MIDI file. So, if the Chord Wizard sees these events, it will use them instead of interpreting the chords, since they are likely to be completely accurate. If you’d prefer the Chord Wizard to ignore these chord events, you set the “OK to use PG Music Chord names from MIDI file” to false.
![]()
The setting for “Write chord summary notes to Soloist Track” is only used for diagnostic or special purposes. If set, the Soloist track will contain a special track that has a chord written every 2 beats (or whatever the setting for chord resolution is) that contains every note found for the chord. This shows you the type of logic that the Chord Wizard was basing its decisions on. If you encounter a song that gives incorrect results for the chords, you can try this setting, and then examine the Soloist track to see the actual notes of the chords.
![]()
You can optionally include controllers, pitch bend, patch changes, and lyrics from the MIDI file.
The Reharmonist
Generate Chords for a Melody
Generate chords for a melody, or an improved chord progression for a melody, with the “Reharmonist” feature. This feature generates a chord progression in the chosen genre, based only on the melody.
The idea of the Reharmonist is to generate a completely new chord progression for a melody, in a genre that you choose (Jazz, Country, etc.). This ignores any existing chords in the song.
There are 2 separate windows for the Reharmonist feature.
- Reharmonize entire song with a new chord progression.
- See a list of possible reharmonizations for a given area of a song.
Chords for a Whole Song
This example uses the melody of Bach’s Brandenburg Concerto #1 in F, 1st movement, but you could use the melody of any song you choose.
Go to the menu Edit | Chords | Auto-Generate Chord Reharmonization.
![]()
You will then see the Select Re-Harmonist dialog.

Deselect “Show-All” and then select the “Bossa Nova (Latin)” genre.
![]()
Note that the program has analyzed the melody and decided that the key should be F (this is independent of any key that was already set in the song).
![]()
Now press [OK – Reharmonize].
![]()
You will then have an entire chord progression written for the song, in a Bossa Nova style.
The Chord Progression generated is different every time, so the one that you get will be different from this one.

|
Play the file that you have generated. Notice the “Bossa” style of chord progression, with 2-5 progressions, and other typical Bossa chords. |
Revisit the Reharmonize dialog, and try generating a new chord progression, in a new Genre.
![]()
For example, “EZ listening (Pop)” will generate a Pop style chord progression, very different from the Jazz chords in the Bossa version.

This dialog can also be opened from the menu command Windows | Auto Generate Chord Reharmonization.
Reharmonize Part of a Song
Now let’s use the Reharmonist in an “interactive mode” where it gives us choices of various chord progressions at each bar. Let’s see if we can interactively improve on the chord progression, according to our own tastes.
The first 2 bars generated originally are:
![]()
Make sure that the currently highlighted cell is bar 1.
Go back to the Select Re-Harmonist dialog.
|
This time choose “Part of Song” and under “Set Range” enter Bar 1, Chorus 1, and the # bars as 2. |
Here are two of the possible variations the Re-Harmonist has suggested for the first two bars.
![]()
![]()
See a List of Possible Reharmonizations
Go to the menu Edit | Chords | Chord Reharmonist Dialog (choose your own).
![]()
In the Reharmonize melody – new chords for 2 bars of the melody dialog you can choose from a list of reharmonizations for any 2-bar segment of the song. The reharmonization starts at the Bar # indicated. Use the [-2] and [+2] buttons to navigate to the segment to be recompiled.
![]()
Use the feature interactively by displaying a menu of possible chord progressions for a portion of the melody and audition them to choose the best one using the “Bar Reharmonist.” This allows you to hear some new chord progressions for existing melodies, or brand-new progressions for tunes without chords.
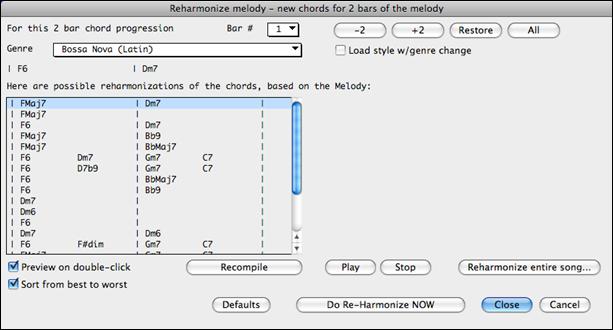
![]() Choose a chord progression, and press [Do-Reharmonize NOW] and the program will insert that progression.
Choose a chord progression, and press [Do-Reharmonize NOW] and the program will insert that progression.
![]() The progressions are sorted in alphabetical order, or from “best to worst” depending on this setting.
The progressions are sorted in alphabetical order, or from “best to worst” depending on this setting.
Chord Breaks
|
|
Insert Breaks (silence) in arrangement, also called Chord Breaks, is found in the Preferences 2 dialog. This is a great feature for practicing tempo control. |

Select the # of bars, and Band-in-a-Box will play for, say 4 bars (selectable), and then will rest all instruments for the next 4 bars. During the silence, you keep playing (comping, drums, melody, etc.), trying to stay in tempo. Drummers can mute the drum part. When the band comes back in after the 4 bars, you will get instant feedback on how well you have maintained the tempo, if the band comes in time with you or not.
Once set, this feature works automatically with all songs until you turn it off.
Guitar Tutor
Use the “Guitar Tutor” to analyze any song. This feature will show the chords that are playing on the virtual guitar fretboard, in your choice of a Jazz, Pop, or Folk perspective. The Guitar Tutor is a fun way to learn about new guitar chords while playing along with your favorite Band-in-a-Box tune.
The Guitar Tutor is most useful on styles that aren’t guitar styles. This would apply to styles that don’t have an exclamation point (!) in the file name. This is because the guitar styles already have a guitar part that you can learn from, on the Guitar part.
Using the Guitar Tutor, you can see (and optionally hear) guitar chords played on the guitar fretboard. This teaches you how to play the chords on guitar.
|
|
To turn the Guitar Tutor on, launch the Guitar window and press the [Tutor] button. |

Using the Guitar Tutor
Enable the Chord Tutor display by setting that checkbox. This will silently display the chords on the guitar fretboard. If you would also like to hear the notes, select the “Play chords through MIDI” checkbox.
The Tutor part uses the MIDI Thru part to playback on. You can control volume, pan, reverb, and tone by using the Thru settings in the Mixer. You can also select the patch here.
![]()
The tutor will display Jazz, Pop, and Folk voicings in easy, medium, and advanced forms. The advanced forms use inversions, and changing patterns of chords, while the easy ones just stick to the common “campfire” chords.
![]() One of the tutors uses 3-note Jazz voicings to simulate the famous Big Band chord guitar comping styles. If you use this, you will only see 3 notes in the chords of course. Since it sometimes helps to see the entire 4 chord voicing, in this case there is the option to show the muted note as well.
One of the tutors uses 3-note Jazz voicings to simulate the famous Big Band chord guitar comping styles. If you use this, you will only see 3 notes in the chords of course. Since it sometimes helps to see the entire 4 chord voicing, in this case there is the option to show the muted note as well.
The Guitar Tutor stays enabled until you change the Guitar track to another track (for example, to change it to the Bass track). You can easily re-enable it by clicking on the [Tutor] button again.
Turn the tutor off by disabling the “Enable Chord Tutor Display” setting.
Chord Substitution Wizard
Reharmonizing a song with the Chord Substitution Wizard is a fun and educational way to perform or practice a familiar song in a brand-new way. This feature is very easy to use; simply highlight an area of chords and select “Chord Substitution.” The possible chord substitutions are instantly displayed for you.
For example, if you had chords such as “Dm7 G7 Cmaj7,” a list of substitutions including the tritone substitution “Dm7 Db7b5 Cmaj7” would be offered to you for use in your song. There are also helpful comments associated with each substitution, showing you why a given substitution might work in each case (e.g., is the melody compatible with the substitution, etc.). Alternatively, you can enable the “Auto-Substitution feature and the substitutions will be selected according to the general preset preferences.
There are two ways to get chord substitutions, you can let Band-in-a-Box show you a list of possible substitutions to pick from yourself (Edit | Chords | Chord Substitution Dialog), or you can let Band-in-a-Box pick them automatically (Edit | Chords | Auto-Generate Chord Substitutions).
Chord Substitutions Dialog

The appearance of this dialog depends on what chords are present at the highlighted bar. This bar number is shown in the dialog and may be changed. In the example above, the chord is an F7 chord, so the substitutions shown are for an F7 chord. The substitutions shown may work for up to 4 bars, depending on the substitution. In the examples above, the substitutions work for 2 bars.
You can control what types of substitutions to see by using the Jazz/Pop checkbox. Some substitutions include more chords than the original, some simplify the progression, and these can be viewed using the checkboxes. You can elect to exclude substitutions that have a chord on each beat.
The “Types of Substitutions to include” combo box will filter the substitutions to include only the best substitutions or all of them.
The “reload” [Recompile] button is only used if you have edited the chordsub.txt file to add your own substitutions.
Once you see a substitution that you like, you can enter it onto the worksheet by pressing the [Do Substitutions now] button or double-clicking on the substitution line. You can then move the current bar to the next part of the song that you need a substitution for and repeat the process.
You can undo the substitution by pressing the [Restore] or [All] button.
Auto-Chord Substitution Dialog
You can quickly auto-generate substitutions for an entire song or portion of a song using the auto-substitution dialog. For example, we can generate substitutions for the !Freddie.MGU song. Here is the original chord progression.

By using the auto-substitution dialog, we can generate substitutions for the whole song, and we get this result:

You can see that Band-in-a-Box chose the substitutions for about 70% of the chords in the song (that’s what we told it to do in the dialog). Some of the substitutions chosen are more advanced than that (replacing an F7 with a B13 for example)
Here are the settings in the auto-substitution dialog that produced this result:

If you’d like Band-in-a-Box to only generate for a certain range of bars, you should first highlight that range of bars in the Chord Sheet, then launch the dialog. The Range will then be set to Part of the song and the bar # and # of bars settings will also be set. You can override these settings with manual settings, if necessary.
Chord Builder
|
The Chord Builder is launched with the [Chord Builder] toolbar button, with the menu item Edit | Chord Builder, or with the keystrokes control+shift+H. |
This feature allows you to hear and build chords up by clicking on the root, extension (and alternate root if applicable). Chords are previewed as they are built.
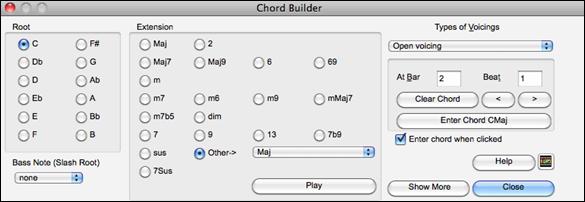
To enter a chord at the current bar, click on the root of the chord (in the “Root” group), the extension (Maj7 etc.), and an alternate “slash-note” root if desired.
For example, to make the chord F9/A, you would click on the “F” root, the “9” extension, and the Slash Root of “/A.” As you click on them, you will hear the bass note played on the Bass part, and the extension played on the Piano track.
If you are happy with the sound of the chord, you can press the [Enter Chord] button to enter the chord at the bar and beat specified. If you would like the chord to be inserted automatically when you click on the note/extension names, select the “Enter chord when clicked” option. This will advance the Bar/Beat position. You can change the Bar/Beat settings to move to a different bar. The [<] & [>] buttons move 1 beat on right click, and 2 beats on left click.
If you are happy with the sound of the chord, you can press the [Enter Chord] button. That enters to enter the chord at the bar and beat specified. If you would like the chord to be inserted automatically when you click on the note/extension names, select the “Enter chord when clicked” option.
Clicking on the [<] & [>] buttons moves 2 beats and control+clicking on these buttons moves 1 beat.
The Chord Builder can be left open as you work entering chords into Band-in-a-Box. Remember that you can also play chords in from the MIDI keyboard by pressing control+return after you’ve played a chord.
Pressing the [Show More] button will open the Chord Theory section, which displays and suggests chords that are most popular in the current key.

The top row is diatonic chords. Other rows add additional chords that are part of the key, such as dominant 7th approach, slash chords, parallel minor, diminished, and more. This allows you to quickly enter chords by clicking on the most common chords in the key. For example, if you stick to the top row (diatonic), the chord progression you enter will be a typical song progression. Choosing from other rows will add variation and color to the progression. This is a fun, interactive way to enter and explore chord progressions, and learn music chord theory at the same time.
For example, if you are in the key of F, the top row shows the most common chords in the key of F, which are the diatonic chords. You can just click on chords on this row to enter your chord progression using the most popular chords. Lower rows have additional chords in the key of F, like G7, A7, etc.
You can enable the “Jazz” checkbox to show jazz chords (e.g. sevenths like Maj7) instead of pop chords (e.g. triads like C).
F Gm Am Bb C Dm Em7b5 (in pop mode)
FMaj7 Gm7 Am7 BbMaj7 C7 Dm7 Em7b5 (in jazz mode)
Diatonic: These are the diatonic chords, made up only of notes in the key. They are the most common chords used in the key, with the 1, 4, and 5 chords being the most common.
Dominant 7: These chords are considered to be in the key when they resolve up a 4th to a scale tone. For example, A7 resolves to D, which is a scale tone in the key of C.
Slash Chords: The diatonic chords are also commonly used with different chord tones as the bass note. They are called slash chords, like C/E.
Parallel Minor: For a major key like C, the chords from the Cm key are also used commonly.
Diminished/Half Dim.: The most common diminished chord used is the 1 diminished family [Cdim7, Ebdim7, F#dim7] in the key of C. Half-diminished chords (e.g. #4m7b5 [F#m7b5] and 7m7b5 [Bm7b5]) are used as 2-5-1 leading to minor diatonic chords.
All (Common): This row lists all commonly used chords with the root in the key.
Clicking on the small button on each row will list more suggestions.

Animated Drum Kit
This sizable window is a cool animated 3D display of a complete drum kit, with all 61 Drum sounds displayed on their instruments. Watch the various drum instruments being played, or play-along/record on any of the drum instruments by using QWERTY keys or a mouse. Very educational and lots of fun!
| To launch the Drum Kit window, click the [Drums] button, or choose the Windows | Drum Window option. Then the Drums Kit window will display an animated display of a complete GM drum kit. |
You can do several things with the Drums Window:
- Watch the Drum part being played on the Drums Window in real time.
- Play along with the drums in real time by mouse clicking on the Drum Instrument or using QWERTY keys (the key names to use are listed on the Drums Window).
- Record a drum part into Band-in-a-Box. To do this, simply press RECORD in Band-in-a-Box and play along.

Drum Display
All the General MIDI percussion instruments are shown.
Acoustic Bass Drum |
Bass Drum 1 |
Side Stick |
Some percussion instruments are triggered by multiple MIDI notes. When controlled by more than one MIDI note, a percussion instrument will show different behavior in response to the different notes. For instance, the Hi-Hat responds differently to Close Hat, Pedal Hat, and Open Hat MIDI notes.
The on-screen instruments may be played by mouse-click or computer keys. When playing by mouse-click or computer keys, the shift key adjusts velocity between two user-specified levels.
Drums that you play show up in blue (the computer played drums are red). There is an option to display all the QWERTY names on the drums at the same time, so that you can see what keys to hit without having to mouse over the instrument. The drums can be moved off-screen without snapping back to the middle.
To display the QWERTY keys on the notes, select the option in the Drums Window Settings dialog to “Display QWERTY Chars on Drums.”
Multi-note instruments send different notes depending on where you click on the instrument. For instance, the Kick Drum can send three different notes, Ac. Bass Drum (MIDI note 35), Bass Drum 1 (MIDI note 36), and Square Kick (MIDI Note 32).
The hint line at the top of the window describes the current control under the mouse cursor. Use the hint line to learn the mouse-responsive areas of each drum instrument.
Multi-Note Drums Instruments
Kick Drum - Ac. Bass Drum, Bass Drum 1, Square Kick
Snare - Acoustic Snare, Side Stick
Hi Hat - Closed, Pedal, Open
Floor Tom - Low, High
Electronic Pad - Multi-zoned for Hi-Q, Slap, Electric Snare
High Conga - Mute, Open
Surdo - Mute, Open
Cuica - Mute, Open
Metronome - Bell, Click
Whistle - Long, Short
Triangle - Mute, Open
Guiro - Long, Short
Scratch - Push, Pull
Computer “QWERTY” Drum Keys

Numeric Keypad Drum Keys
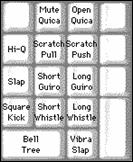
Strike computer keys to play drums.
Drums are grouped on the computer keyboard by category. The kick, snare, and hi-hat sounds are on the lowest keyboard row. The lower-middle row contains toms and cymbals. The upper-middle row contains Latin drums, and the top row contains Latin hand percussion.
The numeric keypad keys contain the remainder of the Latin hand percussion plus the electronic tones.
Drum Kit Main Window
The Drums main window can be resized to tile with other windows of interest.
On 256 color displays, the image does not look its best. The window looks its best if the computer is in Thousands-of-colors (16 bit) or Millions-of-Colors (24 bit) video mode.
Drum Transport Controls
![]()
Place the mouse cursor on each control to see its function.
- Record: Place Band-in-a-Box in Record mode so drum instruments can be recorded.
- Play: Start Band-in-a-Box song playback.
- Rewind: Stop and return to song start.
- Stop: Stop Band-in-a-Box playback.
- Size Buttons 1/1, 1/2, 1/4: Preset the window to full size, half size, or quarter-size. If the window has been changed to a size different from these, by dragging a window border, none of the size buttons will be down.
- Settings Dialog: Adjust program behavior.
Drum Window Settings
In the Drum window, press the [Settings] button (to the left of the Record button), to adjust the Drum Window Settings.

Velocity - When playing drums with a mouse or computer keys, the shift key toggles between two levels of note velocity. The default velocity is 90, with a default shift key velocity of 127.
The two velocity levels can be set any way desired. For instance, if you want the shift key to send quiet notes, program the shift velocity lower than the non-shift velocity.
Randomize - Enables the Randomize checkbox to send random velocity levels when playing by mouse or computer keyboard.
Range - Control the amount of velocity randomization. Usually a small range works best, around 10% to 30%.
If velocity is set to 127, and the random range is set to 20%, notes would randomly vary between a maximum velocity of 127 and a minimum velocity of 102.
Instrument Hints - Customize appearance of the Hint line with Note Name, MIDI Note Number, and Computer Key.
Display Qwerty Characters on Drums displays the QWERTY key names that play each drum in the kit.
Show
- “Show All Instruments” shows all instruments in the drum window.
- “Show Used Instruments” displays the basic trap kit but does not display any extra instruments unless they are used in a song. The drum window is cleared each time Play or Stop is pressed.
Unconditional 30-Day Money Back Guarantee on all PG Music products purchased from PG Music Inc.
PG Music Inc.
29 Cadillac Ave Victoria BC Canada V8Z 1T3
Sales: 800-268-6272, 250-475-2874,+ 800-4746-8742*
* Outside USA & Canada where International Freephone service is available.
Access Codes
Tech Support: Live Chat, support@pgmusic.com
 Online now
Need Help?
Customer Sales & Support
|
Phones (Pacific Time) 1-800-268-6272 1-250-475-2874 |
||
| Live Chat | ||
| OPEN | Online Ordering 24/7 |
|
| OPEN | Forums, email, web support |

