Search Manual
Band-in-a-Box® 2020 for Mac® User's Guide
Chapter 2: QuickStart Tutorial
Creating music with Band-in-a-Box is as easy as 1-2-3! In this tutorial, you will see just how easy it is to get Band-in-a-Box making music for you.
Step 1 – Enter the Chords
There are numerous ways of entering chords into Band-in-a-Box. We will discuss five fast ways of entering chords:
- Using the Computer Keyboard
- Playing directly on a MIDI Controller Keyboard
- Using the Chord Builder
- Importing Chords from a MIDI file
- Loading an Existing Band-in-a-Box Format Song
On the main screen of the program, you will see an area called the Chord Sheet.

Each of the numbered cells on the Chord Sheet represents a bar. In this example, you can see that there is an F6 chord in the first bar of this song. Similarly, one row down, you can see an F6 chord in bar 5, and later in the song, a G7 in bar 7. Notice the box in the first half of bar 1. This is the highlight cell, and it represents the bar you are currently working on. You can move the highlight cell around using the cursor keys, or select a specific bar using the mouse.
Enter Chords Using the Computer Keyboard
To enter a specific chord, move the highlight cell to where you want to place the chord. For example, if you wanted to add (or change) a chord in bar 20, you would highlight bar 20 on the Chord Sheet. Next, type in your chords. If you want F7 at bar 2, type F and 7 on your keyboard and press Return. Notice that when you use the Return key, the highlight cell moves to the second half of the bar. You could then enter another chord at beat 3. Chords are commonly typed using standard chord symbols (like C or Fm7 or Bb7 or Bb13#9/E), but you can enter them in any of the supported chord symbol display formats like Roman Numerals, Nashville Notation, and Solfeggio.
Enter Chords Using a MIDI Controller Keyboard
If you have a MIDI controller keyboard, you can use it to enter chords into Band-in-a-Box. First, you must make sure that your cables are properly connected and you have the correct input drivers selected.
If you play a chord on your MIDI keyboard, and then press command+return, the chord will be entered into the Chord Sheet at the current highlight cell position.
Enter Chords Using the Chord Builder
|
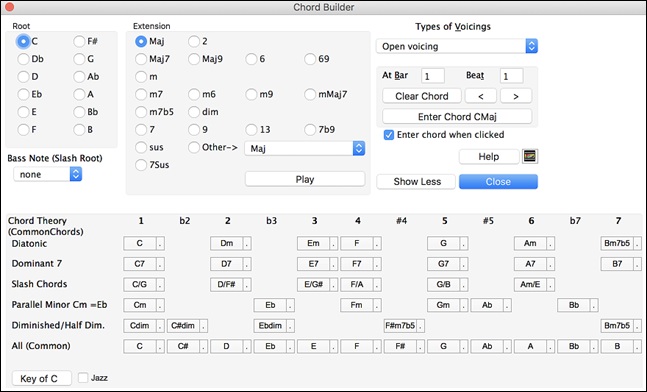
Press the [Chord Builder] button to open the Chord Builder dialog with a list of chord roots and extensions. |

To enter a chord at the current bar, select the chord root from the left pane, and then the extension on the right pane. Pressing [Enter Chord ___ ] enters the chord and advances the highlight cell to the next half bar.
Import Chords from a MIDI File
Band-in-a-Box can import chords from an existing MIDI file with the Chord Wizard.
Choose the File | Import | Import Chords, Tracks and Lyrics from MIDI File menu item or use the keystrokes control+option+I to open the Chord Wizard dialog.

When the Chord Wizard dialog opens, press the [Open (Change)…] button to choose the MIDI file that you want Band-in-a-Box to interpret the chords from.
To help Band-in-a-Box interpret the chords better, you can choose a preset for the song. Choose from among such genres as Pop, Rock, or Jazz Standard.
Load an existing Band-in-a-Box format song
You can load a song using the [Open] or [Song] button on the toolbar. |
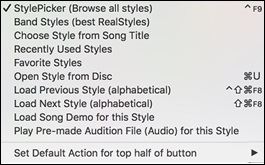
The [Song] is a split button. The top half of the button uses the default method to load a song. The bottom half shows a menu of different methods to load a song and allows you to set the default for the top. Here are the choices available for different methods to load a song.

You could also load a pre-existing song by using the File | Open Song menu item, or by pressing the F3 function key, which will launch the familiar Mac® file dialog. Note that most songs will automatically load a “Style,” which we’ll learn about in the next section.
Going to the next step …
Now that you have chords on your Chord Sheet, you are ready to move on to Step 2 – Choosing a Style.
Step 2 – Choose a Style
Band-in-a-Box creates backing arrangements based on the chords you type in, applied to a particular Style.
What’s a Style?
A style is a set of rules that determine how Band-in-a-Box creates music using your chords. By adjusting the rules, we have created hundreds of styles that are appropriate for everything from Country to Bebop. Some style examples would be Jazz Swing, Blues Shuffle, Hip Hop, Country 4/4, Pop Ballad, Waltz, and Medium Rock to name just a few. If you don’t find a pre-made style that suits your tastes, create one from scratch using the StyleMaker. Making custom styles with the StyleMaker is explained in detail in the full documentation.
Opening a Style
|
You can open a style using the [Style] button. This is also a split button, with the top half being the default function, and the bottom half-listing different methods to load a style and allows you to set the default. |

Selecting a Style using the StylePicker
The StylePicker window lists all styles with full information. It has a great filter feature for finding a perfect style for your song by selecting elements such as time signature, feel, or tempo or by simply typing in a familiar song title.
You can browse styles by sorting columns or hear an “instant” preview by double clicking on the list. If style has both MIDI and RealDrums available, you can hear both, and choose which one you want. This makes it much faster to find the style that fits your song.

Step 3 – Play your song!
Now that we’ve entered chords on the Chord Sheet and chosen a style, it’s time to play the song! First, we need to tell Band-in-a-Box how long our song is, in what key and how fast, and how many times we want the program to play through the chords, in what key, and how fast.
Framing the Song
To tell Band-in-a-Box where the start and end of the song is, look at the middle of the Band-in-a-Box main screen.

Setting the Chorus
Locate the framing settings; there are three of them. The numbers (1-32) in brackets are the bar numbers for the beginning and the end of the Chorus. The number 3 to the right of the brackets is the number of times the Chorus repeats. In the example above, the Chorus starts at bar 1, ends on bar 32, and is going to play 3 times. You can change these settings to play more choruses, or make the Chorus start later, for example in the case where you want an intro to play.
Setting the Key
In the example shown, the key is set to C but you can choose any key by clicking on the key signature and choosing from a list. If you do change the key, Band-in-a-Box will offer to transpose the Chord Sheet for you. If you’ve entered a progression that you intend for a particular key, and then choose the key afterward, you should say no when asked to transpose the Chord Sheet.
Setting the Tempo
If you know the tempo value of your song, you can enter it in the tempo box. The song example above has a tempo of 140. There is an even faster way to enter a tempo. Locate the minus key [-] and the equals key [=] in the number row of your computer keyboard, they are usually next to each other. If you tap the [-] key 4 times at your tempo, Band-in-a-Box will set the tempo automatically for you. If you tap the [=] key four times, Band-in-a-Box will set the tempo and begin song playback!
Press Play
When you are ready, just press the [Play] button or the F4 function key and Band-in-a-Box will immediately generate and play a professional arrangement of your song using the settings and the style you selected. You can double-click on any bar in the Chord Sheet, including the tag or ending, to start playback from that bar.
More fun with Band-in-a-Box
You’ve seen how easy it is to start making music with Band-in-a-Box, but there is still much more for you to discover. For a start, you could add a human element to your arrangement with RealTracks and RealDrums.
Feature Browser
![]() Clicking on the [?] button on the main screen or pressing the / return keys on the Chord Sheet opens the Feature Browser.
Clicking on the [?] button on the main screen or pressing the / return keys on the Chord Sheet opens the Feature Browser.
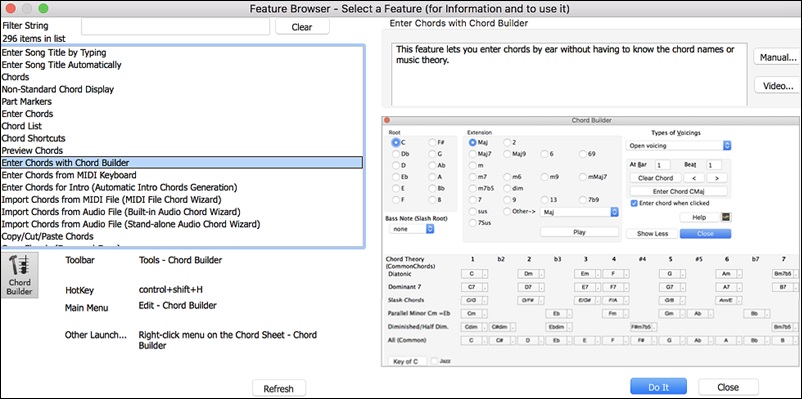
This dialog lists many features in Band-in-a-Box and allows you to browse them, find the feature by text filter, read descriptions about the feature, find how to launch the feature, access to the online information or video about the feature, and do more.

In the dialog, you will see:
- Text filter.
- Info on how to launch the feature from the toolbar, menu, hotkeys and/or other means.
- Memo with description about the feature.
- [Manual] button that links to online information about the feature.
- [Video] button to launch a video. (Tip: over 80 topics have videos, and you can type the word “video” in the filter to find them.)
- A graphic showing the feature.
- [Do It] button that will launch the feature.
This dialog helps in the following situations.
- You know about a feature but don’t know how to find it. Just type a part of the feature name and you’ll see the hotkeys, menu, and toolbar info on how to launch it. For example, if you want to launch the Chord Builder but don’t know how to do it, type “builder” in the text filter, and you will quickly find the Chord Builder.
- You are exploring available features for Band-in-a-Box. For example, if you are a guitar player, type the word “guitar” and you’ll see what’s available.
- You prefer “one-stop-shopping” and would like to launch features from the same dialog.
- You are learning the program and like to browse or watch videos about topics you’re interested in.
- You can’t remember hotkeys and want to review them.
Unconditional 30-Day Money Back Guarantee on all PG Music products purchased from PG Music Inc.
PG Music Inc.
29 Cadillac Ave Victoria BC Canada V8Z 1T3
Sales: 800-268-6272, 250-475-2874,+ 800-4746-8742*
* Outside USA & Canada where International Freephone service is available.
Access Codes
Tech Support: Live Chat, support@pgmusic.com
 Online now
Need Help?
Customer Sales & Support
|
Phones (Pacific Time) 1-800-268-6272 1-250-475-2874 |
||
| Live Chat | ||
| OPEN | Online Ordering 24/7 |
|
| OPEN | Forums, email, web support |
